伪元素是附加在选择器末尾的关键字,伪元素允许您定义所选元素特定部分的样式,而无需使用元素的ID或class属性。 例如,伪元素允许您设置段落中第一个字符的样式,并在元素前后插入一些内容。
在 CSS1 和 CSS2 中,伪元素的使用与伪类相同,都是使一个冒号:与选择器相连。但在 CSS3 中,将伪元素单冒号的使用方法改为了使用双冒号::,以此来区分伪类和伪元素。因此,建议在使用伪元素时使用双冒号而不是单冒号。
selector::pseudo-element {
property: value;
}
其中,selector 为选择器,pseudo-element 为伪元素的名称,property 为 CSS 中的属性,value 为属性对应的值。
注意:一个选择器中只能使用一个伪元素,而且伪元素必须紧跟在选择器之后。按照最新的 W3C 规范,在定义伪元素时您应该使用双冒号::而不是单个冒号:,以便区分伪类和伪元素。但由于旧版本的 W3C 规范并未对此进行特别区分,因此目前绝大多数的浏览器都同时支持使用单冒号和双冒号两种方式来定义伪元素。
CSS 中提供了一系列的伪元素,如下表所示:
| 伪元素 | 例子 | 例子描述 |
|---|---|---|
| ::after | p::after | 在每个 <p> 元素之后插入内容 |
| ::before | p::before | 在每个 <p> 元素之前插入内容 |
| ::first-letter | p::first-letter | 匹配每个 <p> 元素中内容的首字母 |
| ::first-line | p::first-line | 匹配每个 <p> 元素中内容的首行 |
| ::selection | p::selection | 匹配用户选择的元素部分 |
| ::placeholder | input::placeholder | 匹配每个表单输入框(例如 <input>)的 placeholder 属性 |
1. ::after
伪元素 ::after 能够在指定元素的后面插入一些内容,在 ::after 中需要使用 content 属性来定义要追加的内容,而且在 ::after 中必须定义 content 属性才会生效(没有需要插入的内容时可以将 content 属性的值定义为空"")。
下面通过一个示例来演示伪元素 ::after 的使用:
- <!DOCTYPE html>
- <html>
- <head>
- <style>
- p.one::after {
- content:””;
- display: inline-block;
- width: 50px;
- height: 10px;
- background: blue;
- }
- p.two::after {
- content:”要插入的内容”;
- color: red;
- font-size: 6px;
- }
- p.three::after {
- content: url(‘./smiley.gif’);
- position: relative;
- top: 8px;
- }
- </style>
- </head>
- <body>
- <p class=“one”>伪元素 ::after</p>
- <p class=“two”>伪元素 ::after</p>
- <p class=“three”>伪元素 ::after</p>
- </body>
- </html>
运行结果如下图所示:

图:伪元素 ::after 的使用
2. ::before
伪元素 ::before 能够在指定元素的前面插入一些内容。与 ::after 相似,::before 中也需要使用 content 属性来定义要追加的内容,而且在 ::before 中必须定义 content 属性才会生效(没有需要插入的内容时可以将 content 属性的值定义为空"")。
下面通过一个示例来演示伪元素 ::before 的使用:
- <!DOCTYPE html>
- <html>
- <head>
- <style>
- p.one::before {
- content:””;
- display: inline-block;
- width: 50px;
- height: 10px;
- background: blue;
- }
- p.two::before {
- content:”要插入的内容”;
- color: red;
- font-size: 6px;
- }
- p.three::before {
- content: url(‘./smiley.gif’);
- position: relative;
- top: 8px;
- }
- </style>
- </head>
- <body>
- <p class=“one”>伪元素 ::before</p>
- <p class=“two”>伪元素 ::before</p>
- <p class=“three”>伪元素 ::before</p>
- </body>
- </html>
运行结果如下图所示:
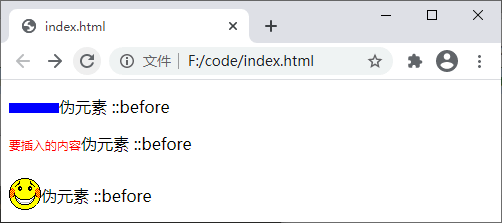
图:伪元素 ::before 的使用
3. ::first-letter
伪元素 ::first-letter 用来设置指定元素中内容第一个字符的样式,通常用来配合 font-size 和 float 属性制作首字下沉效果。需要注意的是,伪元素 ::first-letter 仅可以用于块级元素,行内元素想要使用该伪元素,则需要先将其转换为块级元素。
下面通过示例来演示伪元素 ::first-letter 的使用:
- <!DOCTYPE html>
- <html>
- <head>
- <style>
- p::first-letter{
- font-size: 2em;
- color: blue;
- }
- </style>
- </head>
- <body>
- <p>伪元素 ::first-letter</p>
- </body>
- </html>
运行结果如下图所示:

图:伪元素 ::first-letter 的使用
4. ::first-line
伪元素 ::first-line 用来设置指定元素中内容第一行的样式,与 ::first-letter 类似,伪元素 ::first-line 也仅可以用于块级元素,行内元素想要使用该伪元素,则需要先将其转换为块级元素。
下面通过示例来演示伪元素 ::first-line 的使用:
- <!DOCTYPE html>
- <html>
- <head>
- <style>
- p::first-line{
- font-size: 1.5em;
- color: blue;
- font-weight: bold;
- }
- </style>
- </head>
- <body>
- <p>伪元素 ::first-line 用来设置指定元素中内容第一行的样式,与 ::first-letter 类似,伪元素 ::first-line 也仅可以用于块级元素,行内元素想要使用该伪元素,则需要先将其转换为块级元素。</p>
- </body>
- </html>
运行结果如下图所示:
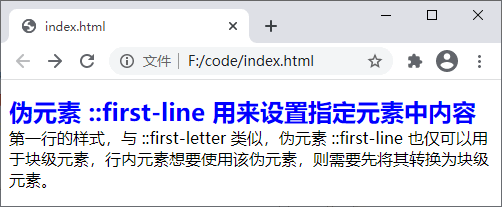
图:伪元素 ::first-line 的使用
5. ::selection
伪元素 ::selection 用来设置对象被选中时的样式,需要注意的是,伪元素 ::selection 中只能定义元素被选中时的 color、background、cursor、outline 以及 text-shadow(IE11 尚不支持定义该属性)等属性。
下面通过示例来演示伪元素 ::selection 的使用:
- <!DOCTYPE html>
- <html>
- <head>
- <style>
- p::selection{
- color: red;
- background-color: #CCC;
- }
- </style>
- </head>
- <body>
- <p>伪元素 ::selection 用来设置对象被选中时的样式,需要注意的是,伪元素 ::selection 中只能定义元素被选中时的 color、background、cursor、outline 以及 text-shadow(IE11 尚不支持定义该属性)等属性。 </p>
- </body>
- </html>
运行结果如下图所示:
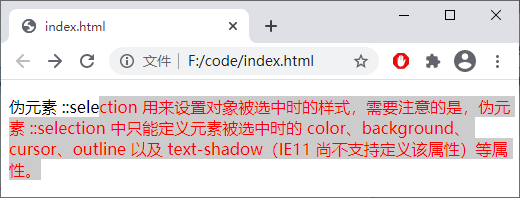
图:伪元素 ::selection 的使用
6. ::placeholder
伪元素 ::placeholder 用来设置表单元素(<input>、<textarea> 元素)的占位文本(通过 HTML 的 placeholder 属性设置的文本),示例代码如下:
- <!DOCTYPE html>
- <html>
- <head>
- <style>
- input.text::placeholder{
- color: red;
- background-color: #CCC;
- }
- </style>
- </head>
- <body>
- <input placeholder=“请输入一段文本”>未使用伪元素 ::placeholder<br>
- <input placeholder=“请输入一段文本” class=“text”>使用伪元素 ::placeholder 的效果
- </body>
- </html>
运行结果如下图所示:

图:伪元素 ::placeholder 的使用







暂无评论内容