在制作创建网页的过程中,可能需要圆角化的效果。 以前,剪切(将设计原稿剪切为容易在页面上制作的图像),使用多个背景图像将角弄圆。 CSS3问世后,就不需要这样的麻烦了。 CSS3提供了一组用于设置元素圆角效果的属性。 请参照以下内容。
- border-top-left-radius:为元素左上角设置圆角效果;
- border-top-right-radius:为元素右上角设置圆角效果;
- border-bottom-right-radius:为元素右下角设置圆角效果;
- border-bottom-left-radius:为元素左下角设置圆角效果;
- border-radius:上面四个属性的简写形式,可以同时为元素的四个角设置圆角效果。
上述函数的可选值如下表所示:
| 值 | 描述 |
|---|---|
| length | 通过数值加单位的形式定义圆角的形状 |
| percentage | 以百分比的形式定义圆角的形状 |
border-*-radius
通过上面的介绍我们知道,通过 border-*-radius 系列函数能够分别为元素的四个角设置圆角效果,函数的语法格式如下:
border-*-radius:[ <length> | <percentage> ]{1,2}
语法的含义为,需要为 border-*-radius 属性提供 1~2 个参数,参数之间使用空格进行分隔。其中第一个参数表示圆角水平方向的半径或半轴,第二个参数表示圆角垂直方向的半径或半轴,如果省略第二个参数,那么该参数将直接沿用第一个参数的值。

图:元素四角
【示例】使用四个 border-*-radius 属性为元素设置圆角效果:
- <!DOCTYPE html>
- <html lang=“en”>
- <head>
- <style>
- div {
- width: 350px;
- height: 100px;
- padding: 15px 0px 0px 25px;
- }
- .one {
- border-top-left-radius: 2em 0.5em;
- border-top-right-radius: 1em 3em;
- border-bottom-right-radius: 4em 0.5em;
- border-bottom-left-radius: 1em 3em;
- background-color: #CCC;
- margin-bottom: 10px;
- }
- .two {
- border-top-left-radius:2em;
- border-top-right-radius:2em;
- border-bottom-right-radius:2em;
- border-bottom-left-radius:2em;
- background-color: #888;
- }
- </style>
- </head>
- <body>
- <div class=“one”>
- border-top-left-radius: 2em 0.5em;<br>
- border-top-right-radius: 1em 3em;<br>
- border-bottom-right-radius: 4em 0.5em;<br>
- border-bottom-left-radius: 1em 3em;
- </div>
- <div class=“two”>
- border-top-left-radius:2em;<br>
- border-top-right-radius:2em;<br>
- border-bottom-right-radius:2em;<br>
- border-bottom-left-radius:2em;
- </div>
- </body>
- </html>
运行结果如下图所示:
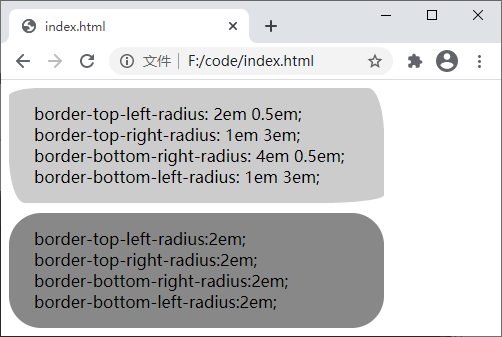
图:border-*-radius 属性演示
border-radius
border-radius 属性是 border-top-left-radius、border-top-right-radius、border-bottom-right-radius、border-bottom-left-radius 四个属性的简写形式,使用 border-radius 可以同时设置四个 border-*-radius 属性。border-radius 属性的格式如下:
border-radius:[ <length> | <percentage> ]{1,4} [ / [ <length> | <percentage> ]{1,4} ]?
语法说明如下:
- border-radius 属性可以接收两组参数,参数之间使用斜杠
/进行分隔,每组参数都允许设置 1~4 个参数值,其中第一组参数代表圆角水平方向上的半径或半轴,第二组参数代表圆角垂直方向上的半径或半轴,如果省略第二组参数的值,那么该组参数将直接沿用第一组参数的值。 - 第一组参数中,如果提供全部的四个参数,那么将按照上左 top-left、上右 top-right、下右 bottom-right、下左 bottom-left 的顺序作用于元素的四个角;如果提供三个参数,那么第一个参数将作用于元素的左上角 top-left,第二个参数将作用于元素的右上角 top-right 和左下角 bottom-left,第三个参数将作用于元素的右下角 bottom-right;如果提供两个参数,那么第一个参数将作用于元素的左上角 top-left 和右下角 bottom-right,第二个参数将作用于元素的右上角 top-right 和左下角 bottom-left;如果只提供一个参数,那么该参数将同时作用于元素的四个角。
- 第二组参数同样遵循第一组参数的规律,只是作用的方向不同。
【示例】使用 border-radius 属性为元素设置圆角效果:
- <!DOCTYPE html>
- <html>
- <head>
- <style>
- ul {
- margin: 0;
- padding: 0;
- }
- li {
- list-style: none;
- margin: 10px 0 0 10px;
- padding: 10px;
- width: 200px;
- float: left;
- background: #bbb;
- }
- h2 {
- clear: left;
- }
- .test .one {
- border-radius: 10px;
- }
- .test .two {
- border-radius: 10px 20px;
- }
- .test .three {
- border-radius: 10px 20px 30px;
- }
- .test .four {
- border-radius: 10px 20px 30px 40px;
- }
- .test2 .one {
- border-radius: 10px/5px;
- }
- .test2 .two {
- border-radius: 10px 20px/5px 10px;
- }
- .test2 .three {
- border-radius: 10px 20px 30px/5px 10px 15px;
- }
- .test2 .four {
- border-radius: 10px 20px 30px 40px/5px 10px 15px 20px;
- }
- </style>
- </head>
- <body>
- <h2>水平与垂直半径相同时:</h2>
- <ul class=“test”>
- <li class=“one”>提供1个参数<br>border-radius:10px;</li>
- <li class=“two”>提供2个参数<br>border-radius:10px 20px;</li>
- <li class=“three”>提供3个参数<br>border-radius:10px 20px 30px;</li>
- <li class=“four”>提供4个参数<br>border-radius:10px 20px 30px 40px;</li>
- </ul>
- <h2>水平与垂直半径不同时:</h2>
- <ul class=“test2”>
- <li class=“one”>提供1个参数<br>border-radius:10px/5px;</li>
- <li class=“two”>提供2个参数<br>border-radius:10px 20px/5px 10px;</li>
- <li class=“three”>提供3个参数<br>border-radius:10px 20px 30px/5px 10px 15px;</li>
- <li class=“four”>提供4个参数<br>border-radius:10px 20px 30px 40px/5px 10px 15px 20px;</li>
- </ul>
- </body>
- </html>
运行结果如下图所示:
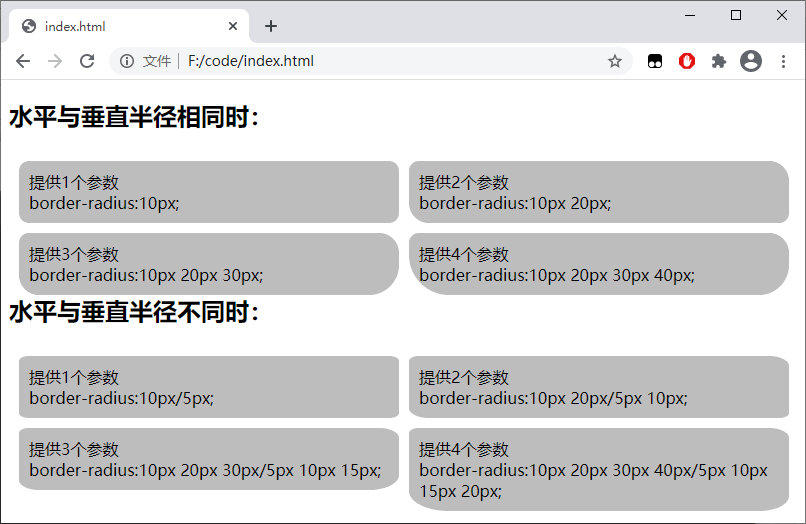
图:border-radius 属性演示
© 版权声明
文章版权归作者所有,未经允许请勿转载。
THE END








暂无评论内容